Showing posts with label DIY. Show all posts

Monday, June 3, 2013

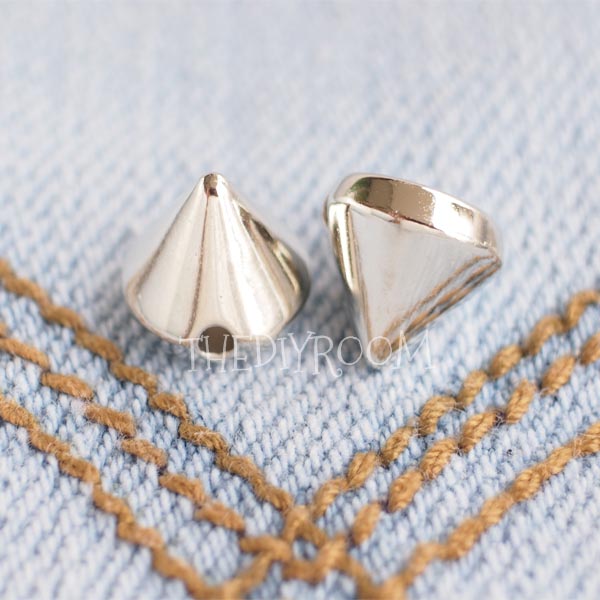
Sew-on Spikes & Dotted Pyramid studs


SEW-ON SPIKE STUDS
Type of studs: Sew-on
Dimensions: 10mm
Colours: Silver

50 for $3.50
200 for $12 


DOTTED PYRAMID STUDS
Type of studs: Prongs
Number of prongs: 4
Dimensions: 8.5mm by 8.5mm
Colours: Silver

50 for $4
200 for $14 


Friday, May 10, 2013

DIY #10: Neon chain bracelet


Saw this advertisment on Facebook by Zalora Singapore and instantly fell in love with the colours!
Bright and bold colours are in the trend now as its SPRING TIME, which means happy bright colours everywhere! Can't help to resist the Neons and decided to do a DIY project using Neon colours! 


Here we go!


What you'll need:
- Strings / Embroidery thread / Suede cords
- Chain 
- Clasp/extensions
- Scissors
- Lighter / Fabric Glue

Duration: 45 minutes

Level of difficulty: 2/5


Step 1. The strings, chains and clasp/extensions were bought from Golden Dragon in People's Park Center. Another favourite spot for sewing supplies is over at Textile Center in Jalan Sultan. The strings and clasp/extensions cost about $1 each, while the rose gold chain was $7.50/meter. 


Step 2. My wrist was about 6 inches and the length of the bracelet was 5 inches. Left some room  as I will add the clasp and extensions later on.


Step 3. The first loop will be for the clasp/extensions. Ensure there's about 2.5-3 inches extra for a knot at the ends. 


Step 4. Place strings through 2nd hole and cross through the 3rd hole. Do that until the 2nd last hole. 


Step 5. Tie a knot to secure the strings and gently put the knot through a flame to melt the strings. Alternatively, fabric glue can also be used in place of a lighter to seals the strings together and prevent it from loosening up. 


Step 6. Add lobster clasp and extensions at the end. 
A toogle clasps would be a better choice as it looks more elegant! 


Hope you enjoyed it!
Thanks for viewing!


<3
thediyroom


Monday, April 22, 2013

Round and conical studs

CONICAL STUDS

Type of studs: Prongs
Number of prongs: 4
Dimensions: 8mm 
Colours: Gold, Silver, Gunmetal

50 for $3.50
200 for $12 
*50 studs/packet/colour


 ROUND STUDS

15mm: silver and gold

Type of studs: Prongs

Number of prongs: 4 and 6
Dimensions:  10mm and 15mm
Colours: 10mm Silver, 
15mm Silver and Gold

10mm(Silver)
50 for $3.50
200 for $12 


15mm(Silver and Gold)
50 for $4
200 for $14 


Friday, April 19, 2013

QUICK UPDATE: APRIL

Hey Lovelies!

QUICK UPDATE

1. To our overseas readers, we now have INTERNATIONAL SHIPPING! HURRAY! However, the only mode of payment is via PayPal. Shipping takes about 6-8days.

2. Round and Conical studs has arrived! To customers who have been waiting for these designs, do Whatsapp us at +6593698799 or email us at sales.diys@gmail.com to purchase.

10mm Round (Silver)            SGD$3.50/50studs
15mm Round (Silver)            SGD$4.00/50studs
8mm Conical (Silver)            SGD$3.50/50studs
8mm Conical (Gunmetal)      SGD$3.50/50studs

Credits:Google


3. Spike studs are arriving in 2-3weeks time! 2 colours available, gold and silver. They are screw-back studs and roughly 10mm in diameter. To reserve, drop us a message at Whatsapp/email. (Price not available yet)

Credits: Tumblr

Example of screw-back studs
Credits: Polyvore


Have a great weekend!

Withlove,
thediyroom

Wednesday, April 10, 2013

OUR FIRST GIVEAWAY!

OUR FIRST GIVEAWAY!


To participate:
1. Like our photo on instagram
2. Follow us
3. Repost this photo
4. Tag @thediyroom and #thediyroomga1


Only 1 lucky winner will walk away with this pretty watch! 
GA closes on 24th April 2013
GOOD LUCK! <3
*Only in Singapore

Friday, March 29, 2013

DIY #9: OMBRE SHORTS


Ombre shorts are really gorgeous and some online shops are selling them at ridiculously high prices. Why not try making your own! 

This tutorial is very similar to DIY#7:Dip-dye shorts, the difference between the two post is that DIY#7 uses 2 colours/dye while DIY#9:Ombre shorts uses 1 dye and create a gradient from light to dark. 


BLEACHING
For denim shorts that are not white, we may have to carry out an extra step, and that's to bleach it. Only authentic denims are suitable for bleaching as they are able to withstand the chemical reactions and will not tear during the process. 

I placed my denim shorts into a pail and added bleach until my shorts is fully submerged. My shorts was placed in bleach for about 2 hours and it still had patches of green. After leaving overnight to dry, the green patches were gone and the shorts turned entirely white. 
**Do wear gloves and try to reduce any contact with bleach as it can cause skin irritation.


DYEING
 For white denims, we can start straight into the dyeing process! So here's what you will need!

What you'll need:
- Shorts
- Pair of gloves
- Pail
- Dyes
- Salt
Duration: 1 hour

Level of difficulty: 3/5


 Dylon dyes: 25 Emerald (Used this for the tutorial) and 33 Kingfisher
Bought from Selffix @ $3.60/dye


Dylon dye: 25 Emerald


Step 1: Add 70 grams of salt into a pail containing 2 liters of BOILING HOT WATER!!
**Please be careful! This dye works best in hot water, there's another type of dylon dye that only works well in  cold water, please check the label when buying the dyes.


 Step 2: I added a tiny amount of dye as I wanted the top to be a very light shade of green, close to white. Soak shorts for about 30 seconds.
**Add the powder dye as close to the water and not at a distance to minimize any potential wind or residue remaining at the wall of the pail.


 Step 3: Add slightly more dye into the pail and submerge only 1/4 of the shorts to the darker tone dye.
Leave shorts in dye for about 30 seconds and then squeeze off excess dye.
** Some colour will fade during the squeezing and washing step, so do soak longer if necessary.


 Step 4: Add slightly more dye into the pail and submerge only half of the shorts to the darker tone dye.
Leave shorts in dye for about 40 seconds and then squeeze off excess dye.
** Some colour will fade during the squeezing and washing step, so do soak longer if necessary.


Step 5: Add slightly more dye into the pail and submerge only the ends of the shorts to the darker tone dye.
Leave shorts in dye for about 1 minute and then squeeze off excess dye.
** Some colour will fade during the squeezing and washing step, so do soak longer if necessary.


Step 7: Leave shorts to dry entirely before washing. 
**At this stage the dye is very easily transferable to any material, do place a protective sheet below shorts if laying on the ground to dry.


After a wash, we have our green ombre shorts! You can add studs, draw, sew your shorts. And this ombre tutorial is not only limited to shorts but also you can try on plain dress, shoes, jackets, pull-overs and anything you like! 

TRY YOURS NOW!


SOME INSPIRATIONS!
*credits to Tumblr


Do not hesitate to email me at sales.diys@gmail.com if you have any questions regarding this tutorial. 
AND Hope you enjoyed this tutorial! :D
Tuesday, March 26, 2013

Tutorial #9 preview

ARE YOU READY FOR OMBRE SHORTS! 

TUTORIAL #9 will be up by this week! 

Stay tuned! 
Credits to pinterest

Thursday, March 7, 2013

Star and Skulls studs

SKULL STUDS
Type of studs: Prongs

Number of prongs: 2
Dimensions: 12mm by 16mm
Colours: Silver, Bronze


1 pair for $1
3 pairs for $3


STAR STUDS
Type of studs: Prongs
Number of prongs: 5
Dimensions: 12mm by 12mm
Colours: Silver

50 for $2.50
200 for $8.50 
*50 studs/packet


Wednesday, March 6, 2013

DIY #8: T-shirt to sleeveless dress


What you'll need:
- T-shirt (2-3 size up)
- Scissors
- String
- Paper clips

Duration: 15 mins 

Level of difficulty: 1/5


 Step 1: Grab a t-shirt that is 2 to 3 size up from your original size. This is to ensure its long enough to be a dress. Also try to get a t-shirt with graphics in the middle or else some parts will be cut off later on.

 Step 2: Take a string, for my case I found that iPhone cable do the same job and its stiffer. Using a paperclip, secure the cable at both ends, this will be a marking of where you'll be cutting for your super large arm-hole. 


Step 3: After cutting 1 side, fold the t-shirt into half long the length and use this gauge to cut the other side.


 YOU'RE DONE IN 3 STEPS! :)


When worn it looks great! 
So start finding extra large t-shirts and carry out the 3 steps and there you go! 
Totally love how fast and easy this DIY can be!


Thanks for viewing! :D